Displacement
Also called Displacement candle, Impulse move, Expansion candle, Strong displacement
Displacement is a sudden, one-sided price move. It is made of one to three large-bodied candles that close beyond a recent swing level and often leave a fair value gap behind, which shows that large orders pushed the market.
If you enter every time price breaks a high or low, many of those breaks fail and hit your stop. Displacement points to the breaks where big traders really committed money. Waiting for it filters out the weak breaks. It also gives you a clear zone to enter and a clear place for your stop.
How to identify displacement: a 6-point checklist
- Mark the level first. Find the recent swing high or low, or the edge of a range. Displacement only means something next to a level it breaks.
- Compare candle size. The move is one to three candles with bodies clearly larger than the candles before them. A workable rule: the body is at least twice the average body of the last 10 candles.
- Check the close. The body closes beyond the level. A wick that pokes through and then closes back inside is not displacement.
- Check the wicks. Strong displacement closes near its high (bullish) or near its low (bearish). The wicks against the move are small.
- Look for the gap. Over three candles, the high of candle 1 and the low of candle 3 do not overlap (bullish case). That empty space is a fair value gap (FVG): a price area that traded in one direction only, with little two-way business.
- Note where it started. Displacement that starts right after a sweep carries more weight than one that starts in the middle of a range. In a sweep, price pokes past an obvious high or low to trigger the stop orders resting there, then turns.
The chart below shows points 1-5 on one move. The quiet candles on the left stay in a tight range. Then one large candle closes well above the range high. The chart shows only five quiet candles, but the same 2× test applies: the breakout body is many times larger than any of them. The next candle's low stays above the high of the candle before the breakout, so a gap opens between them. Later, price pulls back into that shaded zone.
Strong vs weak displacement: what makes a move fail
Strong displacement leaves a gap that stays open for at least a few candles. Price does not instantly give back the move.
A later return into the gap is normal, and it is what the setup below waits for. What matters is timing and depth. A test comes after the gap has held for a few candles, dips into it and stays above its far edge. A fill trades through the whole gap. A wick through the far edge is a fill; only a candle close below it breaks the setup.
A move is weak when the candle only looks big because the whole session is volatile. Always compare it with the candles just before it, not with a quiet day last week. Long wicks against the move and a gap that fills completely within one or two candles, before any test can be traded, are also signs of weakness.
A move is broken when price closes back through the far side of the gap, below candle 1's high in the bullish case. The traders who pushed the move did not defend it, so stop treating the zone as support.
A common misread is the news spike. One candle travels a long way in seconds and then reverses within the hour. To spot it, check the economic calendar and look at the candle's shape: if the wick against the move is longer than the body, treat it as noise, not displacement (checklist point 4). Decision rule: if the next candle closes back inside the old range, it was not displacement.
Reading the EURUSD 1-hour example marker by marker
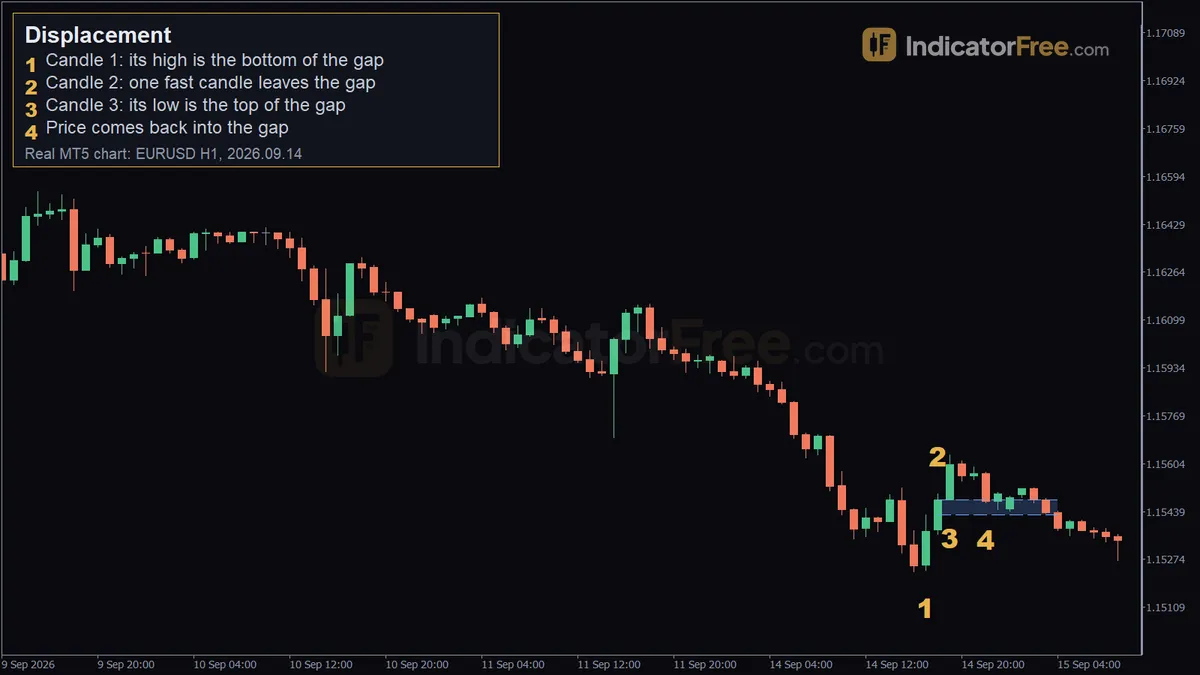
The chart at the top of the page is a past EURUSD 1-hour example from 14 September 2026. It records what happened. It is not a prediction. It shows the gap and the return into it, not the break of a swing level.
- Marker 1, candle 1 (17:00). This is the candle before the push. Its high sets the bottom of the gap at 1.15427.
- Marker 2, candle 2 (18:00). One fast bullish candle, marked at 1.15501, pushes price up and leaves the gap. This is the displacement.
- Marker 3, candle 3 (19:00). Its low at 1.15479 stays above candle 1's high, so it forms the top of the gap. The gap runs from 1.15427 to 1.15479, about 5 pips wide.
- Marker 4, the return (22:00). Three hours later, price comes back to 1.15468, inside the gap. That is 1.1 pips below the gap's top (1.15479 − 1.15468) and still well above its bottom edge, so the gap was tested, not filled.
Setup: buying the pullback into the displacement gap
This is the bullish version. For bearish displacement, flip every step: candle 1's low stays above candle 3's high, and you look for sells when price rallies into the gap above. Your stop goes above candle 1's low plus a buffer.
- Entry: a limit order inside the gap. If you want confirmation, drop to a lower timeframe (the 5-minute chart if you found the gap on the 1-hour). Your entry trigger is a bullish candle inside the zone that closes above the previous candle's high.
- Stop loss: below the bottom of the gap (candle 1's high) plus a small buffer. A wider, safer stop goes below the low where the displacement started.
- Target: first the displacement high, then the next swing high above it.
- Filter: take the trade only if the distance to the first target is at least twice the stop distance.
- Optional filter: give priority to displacement that starts right after a sweep of a nearby low (checklist point 6).
Applying the setup to the 14 September example
Say you had entered where price returned, at 1.15468. A stop below the gap bottom risks more than 4.1 pips (1.15468 − 1.15427 = 0.00041).
Candle 2 is marked at 1.15501, the nearest reference above your entry. That is only 3.3 pips away (1.15501 − 1.15468 = 0.00033). The example does not give candle 2's exact high. Still, the room above you is small next to the 4.1-pip risk, so the filter says skip. If the displacement high is too close, the trade fails, even if a higher-timeframe swing high sits further up. Skip it. The lesson: a narrow gap that sits close to the top of the move leaves too little room.
Sizing a trade on a wider gap
The figures here are an illustrative example on a USD-quoted pair, where one standard lot (100,000 units) is worth $10 per pip. You have a $10,000 account and risk 1%. Your entry is 15 pips above the gap bottom, and you add a 5-pip buffer below it. The calculation below turns that into an order size and a minimum target.
If the next swing high is less than 40 pips away, the trade fails the filter, however clean the displacement looks.
When displacement works and when to stay out
Displacement is most useful during the busiest hours of the pair you trade and in the direction of the higher-timeframe trend. The first test of a gap is usually the cleanest, because each test uses up the orders resting in the zone.
Stay out in thin holiday or late-session markets, and inside tight choppy ranges where any normal candle looks big.
Two drawbacks remain even when you follow every rule. Price may never come back to the gap, so you miss the move. And the 2× rule helps, but where you draw the line for a "large" candle is still a judgment call.
Write down the session and news timing of each displacement you trade. After a few weeks, you will see which conditions give you clean moves.
FAQ
Does displacement work in futures and stock trading?
Yes. The idea is the same on any liquid market with candles. In futures you can also check exchange volume: check whether volume on the displacement candle is clearly higher than on the candles before it. If it is not, treat the move with more caution.
What timeframe should I use to find displacement for day trading?
Set your direction on the 4-hour or 1-hour chart. Look for displacement on the 15-minute or 5-minute chart, and fine-tune your entry on the 1-minute chart. Displacement on a lower timeframe that goes against the higher-timeframe direction is more likely to fail.
Can displacement happen without a fair value gap?
Yes. A large candle can close beyond the level while the next candle's low dips back to overlap candle 1's high. Points 1-4 still hold, so the break is real, but there is no gap for the setup above. Either skip the entry or wait for a fresh move that leaves a gap.