Take profit
Also called TP, take-profit order, profit target, target price, limit exit
A take profit (TP) is an order that closes your trade automatically when price reaches a level you chose in advance, locking in the gain. On a buy it sits above your entry; on a sell, below it.
A take profit turns an open, floating gain into money in your account without you watching the screen. It also fixes your reward before you enter, so you can compare it with your risk and decide whether the trade is worth taking at all. You type the price into the take profit (TP) field of the order window, and you can add or move it on a trade that is already open.
The take profit formula: price level first, money second
You need two numbers: where the order sits, and what it pays if it fills.
Buy:   take profit price = entry + (stop distance × reward multiple)
Sell:  take profit price = entry − (stop distance × reward multiple)

Profit in money = take profit distance in pips × pip value per lot × lots
The reward multiple is how many times your risk you aim to earn. A multiple of 2 means the target is twice as far from entry as the stop, often written 1:2.
On pairs where USD is the second currency, such as EURUSD or GBPUSD, one standard lot (100,000 units) is worth $10 per pip. On other pairs, for example USDJPY, the pip value is different, so check it before you put $10 into the formula.
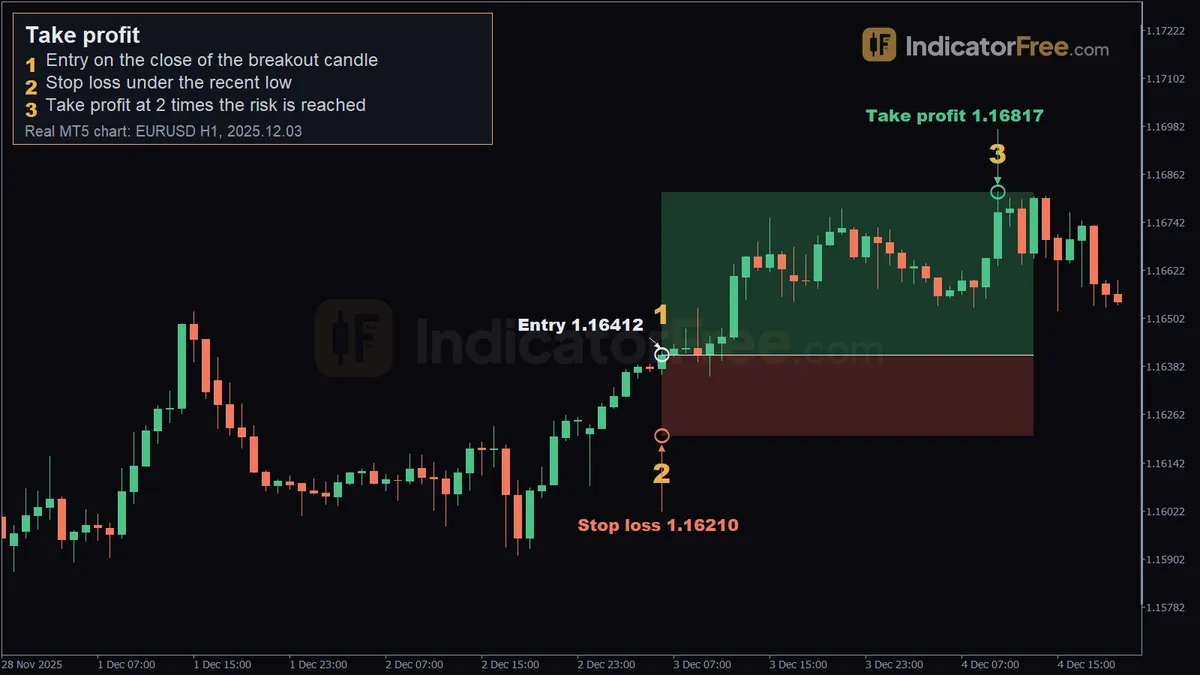
A real take profit hit: EURUSD buy, 1-hour chart
This is a past trade on a 1-hour EURUSD chart, shown as an example, not a prediction. The buy was opened at 1.16412 on 3 December 2025 at 06:00, at the close of the candle that closed above the recent high. The stop loss went at 1.16210, under the recent low, which is 20.2 pips of risk. The take profit was set at 1.16817, 40.5 pips away, so the target was about twice as far from entry as the stop. Price reached it on 4 December 2025 at 10:00.
Worked take profit maths for 500, 5,000 and 50,000 USD accounts
The figures here are an illustrative example: a buy at 1.1000 on a USD-quoted pair, a 20-pip stop, a reward multiple of 2, and 1% of the account risked per trade.
The target distance is the same for every account: 20 × 2 = 40 pips. The take profit price is 1.1000 + 0.0040 = 1.1040. Only the lot size changes.
- $500 account. Risk: $500 × 1% = $5. Lots: $5 ÷ (20 × $10) = 0.025, rounded down to 0.02 because most brokers accept lots in steps of 0.01. Pip value: 0.02 × $10 = $0.20. Profit at take profit: 40 × $0.20 = $8. Loss at the stop: 20 × $0.20 = $4. Because of the rounding, this trade risks $4, or 0.8% of the account, not the planned $5, and the target pays $8 instead of $10. On a small account, rounding the lot size down cuts both the risk and the reward.
- $5,000 account. Risk of $50 gives 0.25 lots and a profit of $100 at the take profit. The calculation below shows every step.
- $50,000 account. Risk: $500. Lots: $500 ÷ (20 × $10) = 2.50. Pip value: $25. Profit at take profit: 40 × $25 = $1,000.
Copy the steps below with your own numbers.
Quick reference: the same trade at four reward multiples
This table keeps the $5,000 trade from the example (buy at 1.1000, 20-pip stop, 0.25 lots, $2.50 per pip) and changes only the reward multiple. The loss at the stop is $50 in every row.
| Reward multiple | Take profit distance | Take profit price | Profit at take profit |
|---|---|---|---|
| 1 (1:1) | 20 pips | 1.1020 | $50 |
| 1.5 (1:1.5) | 30 pips | 1.1030 | $75 |
| 2 (1:2) | 40 pips | 1.1040 | $100 |
| 3 (1:3) | 60 pips | 1.1060 | $150 |
The reward multiple also tells you how often the trade has to reach its take profit just to break even, before costs:
Trades that must hit the take profit = 1 ÷ (1 + reward multiple)
At 1:1 that is 1 ÷ 2, so 1 trade in 2. At 1:1.5 it is 1 ÷ 2.5, so 2 trades in 5. At 1:2 it is 1 ÷ 3, so 1 in 3. At 1:3 it is 1 ÷ 4, so 1 in 4. You can check the 1:2 row with the $5,000 trade: over 3 trades, one take profit pays $100 and two stops cost 2 × $50 = $100, so you end at $0. A smaller multiple means your trades have to reach the target more often.
Checking the target against the chart before you enter
The formula gives a price. The chart tells you whether price has room to get there.
Use this rule: if a clear barrier, such as a recent swing high above a buy, sits between your entry and the calculated target, do one of two things. Either move the take profit just in front of the barrier and recheck the reward multiple, or skip the trade if the multiple drops below the minimum you set for yourself.
The bars below show that situation, using the same illustrative buy at 1.1000: a prior swing high at 1.1030 sits between the entry and the calculated 1:2 target at 1.1040, and the adjusted take profit is placed just under it at 1.1027.
Now recheck the multiple. The adjusted take profit is 1.1027 − 1.1000 = 27 pips from entry. The stop is still 20 pips away, so 27 ÷ 20 = 1.35. Moving the target in front of the barrier lowers the reward-to-risk from 1:2 to about 1:1.35: each win now pays 27 pips while each loss still costs 20, and that trade-off is the decision you are making. If your minimum is 1:1.5, you skip this trade.
One common misread affects sell trades. Most charts draw the bid price, but a sell closes at the ask, which is higher by the spread. Price can touch your take profit line on the chart and the order still does not fill. On a sell, set the target one spread above the level you expect price to reach. As an illustrative example: if you expect the chart to fall to 1.1000 and the spread is 1 pip, set the sell take profit at 1.1001.
Take profit mistakes that cost money
- Picking the target by money, not by the chart. "I want $100" says nothing about where price can go. Set the level first, then size the position.
- Pulling the target closer when price hesitates. You cut the reward while the risk stays the same, so the trade no longer matches the plan you tested.
- Pushing the target further once it is nearly hit. The trade that would have closed in profit stays open, and price can turn back and give the gain away.
- Setting a take profit with no stop loss. The gain is capped and the loss is not.
- Ignoring costs on small targets. Spread and commission take a larger share of a 5-pip target than of a 40-pip one.
FAQ
Will my take profit always fill at the exact price I set?
A take profit usually fills at your price or better, because many brokers treat it as a limit order. With market execution, some brokers fill a triggered take profit as a market order, and it can slip, so check your broker's execution type. If the market gaps past your level, for example over a weekend, the fill depends on the broker: some give you the better price, others fill exactly at your level. The main reason a touched line does not fill at all is the sell-side spread case described above.
Can I close only part of my position at the take profit?
Yes. Many traders close a portion at a first target and leave the rest running with the stop moved to entry. If your platform allows one take profit per position, split the trade into two smaller orders with different targets.
Do I need a take profit when day trading or trading crypto?
No, it is optional. If you cannot watch the trade until it ends, set one. If you exit manually or with a trailing stop, you can leave it off as long as the stop loss is set. The order works the same in forex, crypto, stocks and indices, and in crypto, which trades around the clock, it covers the hours you are away from the screen.