Fresh zone
Also called Untested zone, Unmitigated zone, Virgin zone, Fresh supply zone, Fresh demand zone
A fresh zone is a supply or demand zone that price has not come back to since the strong move that created it. Traders expect unfilled orders to still sit there, so they treat the first return as the best entry.
Each time price comes back to a zone, it uses up some of the orders that caused the first move. So the first return is usually the one worth trading. If you can't tell a fresh zone from one that has already been tested, you will often buy or sell into a level that has nothing left to give.
How to tell a zone is still fresh: a six-step check
- Find a strong move. Look for several large candles in a row with little overlap. A slow drift does not count.
- Mark the base candle. This is the last opposite-colour candle before the move: the last bearish candle before a rally, or the last bullish candle before a drop.
- Draw the zone. For demand, draw from the base candle's low up to its open (or its high, if you want a wider zone). For supply, flip it: from the high down to the open or low.
- Confirm a break. The move should take out a recent swing high (for demand) or swing low (for supply). If it doesn't, the move was only noise inside a range.
- Measure the move against the zone. The move should travel several times the zone's height. A large move away from a narrow zone points to an order imbalance.
- Scan every candle since price left. If no candle, wick included, has traded back into the zone, it is fresh.
What makes a fresh zone weak, tested or broken
A zone stops being fresh the moment any candle trades into it. From then on it is a tested zone. It can still hold, but part of its orders are gone. Use one strict rule: if a wick enters the zone, count it as tested, even when the candle closed outside. The chart below shows both cases. On the left zone, the pullback stays above it, so it is still fresh. On the right zone, one wick pokes in and the candle closes back above, so that zone is tested.
A zone is broken when a candle closes clean through the far edge. A demand zone with a 1-hour close below its low has failed. Don't keep moving your stop to rescue it.
Some zones are fresh but weak from the start:
- The base is many candles of sideways chop, not one or two candles.
- The move away was slow and overlapping, or it never broke a swing point.
- The zone is so tall that a stop beyond it costs more than the trade can pay back.
- It points against the trend on a higher timeframe, such as a fresh demand zone on the 1-hour chart sitting inside a daily downtrend.
A common misread is drawing the zone from the first big candle of the move instead of the base candle before it. That puts your entry too high on demand (too low on supply), so price often turns before reaching your order, or your stop ends up too tight. Go back one candle and check that it closed against the move.
The EURUSD 1-hour chart above, marker by marker
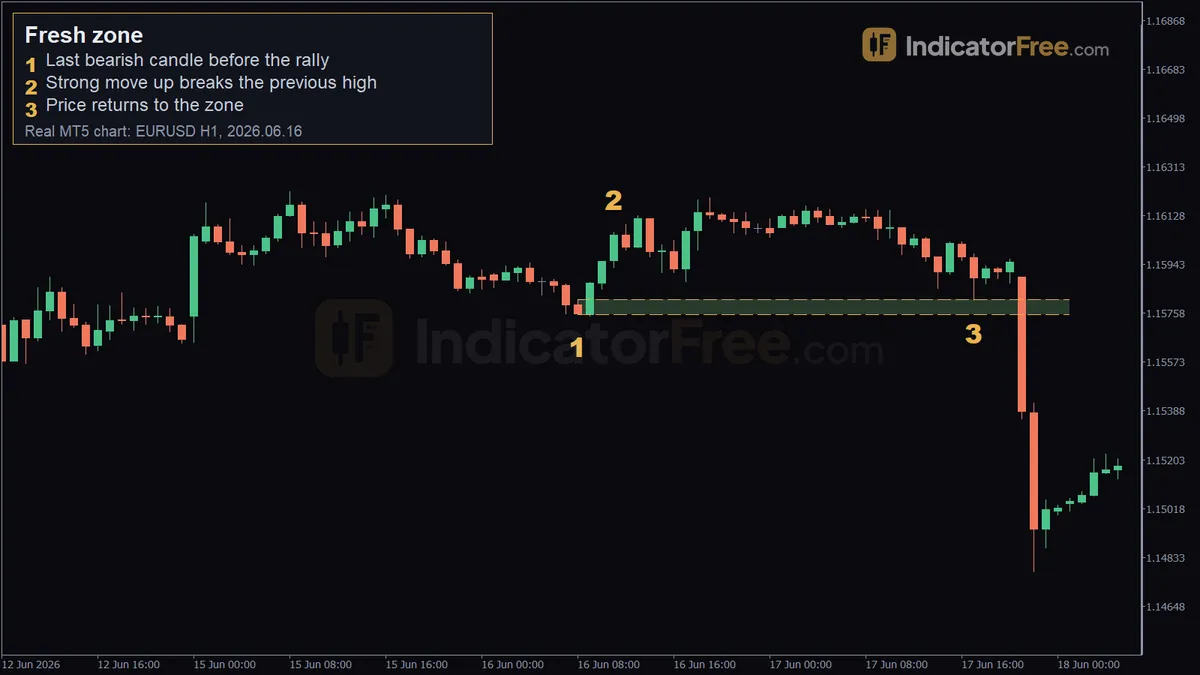
The chart at the top of the page shows a past EURUSD 1-hour example. It is not a forecast.
- Marker 1, 2026.06.16 08:00: the last bearish candle before the rally. Its low at 1.15753 sets the bottom of the zone, and the zone runs up to 1.15810. That makes it 5.7 pips tall (1.15810 - 1.15753 = 0.00057).
- Marker 2, 2026.06.16 11:00: three candles later, price had moved 30 pips and broken the 10-bar high, reaching 1.16065. A 30-pip move from a 5.7-pip zone is about five times the zone's height. That meets steps 4 and 5 of the check.
- Marker 3, 2026.06.17 17:00: price came back to 1.15808, just inside the top of the zone. From there it rose 15 pips.
The gap between marker 2 and marker 3 matters. Price spent more than a day away from the zone before returning. If price comes back within an hour or two, the move away was not strong enough to leave many unfilled orders behind.
Two ways to enter a fresh demand zone
Below, the past EURUSD example is turned into two trade plans. The prices come from the chart; the stop distance and position size are an illustrative calculation. The fresh demand zone runs from 1.15753 to 1.15810, and the rally's high at marker 2 is 1.16065. The levels below show the zone, the entry and the target.
Setup 1: buy limit at the top of the zone
- Entry: a buy limit at 1.15810, the top edge of the zone. The return to 1.15808 on 2026.06.17 17:00 would have filled it.
- Stop loss: 5 pips below the zone low of 1.15753. That is 10.7 pips from entry (5.7 pips of zone plus 5). A wick that dips just under the zone low won't stop you out.
- Target: 1.16065, the rally's high at marker 2, so the target is a retest of that high. That is 25.5 pips above entry (1.16065 - 1.15810 = 0.00255).
That is 10.7 pips of risk for 25.5 pips of reward, or about 2.4 to 1. In the recorded move, price rose 15 pips after the return, so the trade was in profit but had not reached 1.16065 within the facts shown. Aiming at the next opposing level like this is what traders mean by zone-to-zone trading: you buy at one zone and take profit in front of the next level on the other side. The calculation below turns the 10.7-pip stop into a position size for a $3,000 account risking 1%, on EURUSD, where one standard lot (100,000 units) is worth $10 per pip. 0.28 lots is the largest size that keeps the loss under $30.
Setup 2: wait for a bullish candle to close
- Entry: you wait for a bullish candle on the same 1-hour chart to close after the touch of 1.15808, and buy at that close, above the 1.15810 zone top.
- Stop loss: the same, 5 pips below 1.15753.
- Target: the same 1.16065.
Every pip the confirming candle closes above the zone top adds a pip of risk and removes a pip of reward. The facts don't give that candle's close, so assume for illustration that it closes 5 pips above 1.15810. Then you risk 15.7 pips to make 20.5, about 1.3 to 1. Waiting gave you proof that buyers stepped in, but it cost most of the edge. Decision rule: if the confirmation entry leaves less than 2 to 1 to your target, skip it or use the limit order. In this example, the close would need to sit within about 1 pip of the zone top to keep 2 to 1. Confirmation works better when the zone is narrow or the target is far away.
When fresh zones work and when to stay out
Fresh zones work best when the trend on a higher timeframe points the same way, the departure was fast and clean, and price takes a while before it returns. They work worst in tight sideways ranges, where zones form and fail all the time. They also fail around major news, when price can run through any level. If the higher timeframe trend runs against your zone, cut your size or pass.
| Pros | Cons | |
|---|---|---|
| Entry | Exact price for a limit order | Limit orders can fill just before a breakdown |
| Risk | Stop sits just beyond a clear edge | Tall zones force wide stops |
| Objectivity | "Touched or not" is easy to check | Where to draw the zone (open or high) is a judgement call |
| Reward | First returns often give room to the next zone | After the first touch, each retest offers less |
Fresh demand zone and fresh supply zone
A fresh supply zone is the mirror of the demand zone above: it sits over a drop that broke a low, you sell its first retest, and your stop goes above the zone's high. What happens after the first touch has its own glossary entries: Tested zone, and Flipped zone for a broken zone that switches roles.
Practical tips for trading the first touch
- Note how many times each zone has been touched, right on the chart. Your memory will mix them up after a week.
- Check the zone on the next higher timeframe. A zone that is fresh on the 1-hour chart may sit inside a tested zone on the 4-hour chart.
- Size every trade from the stop distance, as in the calculation above, never from a fixed lot.
- Cancel the limit order if price closes beyond the far edge of the zone before reaching your entry. The setup is gone.
- If price grinds sideways right above the zone for many candles, those small touches use up orders. Treat the zone as weaker.
Quick checklist before you place the order
- Did a fast move leave the zone and break a swing point?
- Has no candle, wick included, traded back into the zone?
- Is the zone short enough that your stop fits your 1% risk?
- Is there at least 2 to 1 room to the next opposing zone?
FAQ
How long does a zone stay fresh?
There is no time limit. A zone stays fresh until price trades into it. Older zones on short timeframes matter less, because many newer levels have formed since. On the daily chart, zones that are months old are still watched.
What if price gaps over the zone at the weekend open?
Treat the first candle after the gap like any other candle. If it trades inside the zone, the zone is tested. If it closes beyond the far edge, the zone is broken, even though no trades happened at the zone's prices. A gap can also jump past your stop, so the loss can be larger than you planned.
Can I trade a second touch?
You can, but treat it as a tested zone. Use smaller size, a closer target, and stricter confirmation. The fresh-zone logic applies to the first return only.