NR7
Free NR7 indicator for MT5: marks narrow-range bars, ID NR7 inside bars, boxes and breakout arrows. Lab repaint test: 0 of 1879 signals changed.
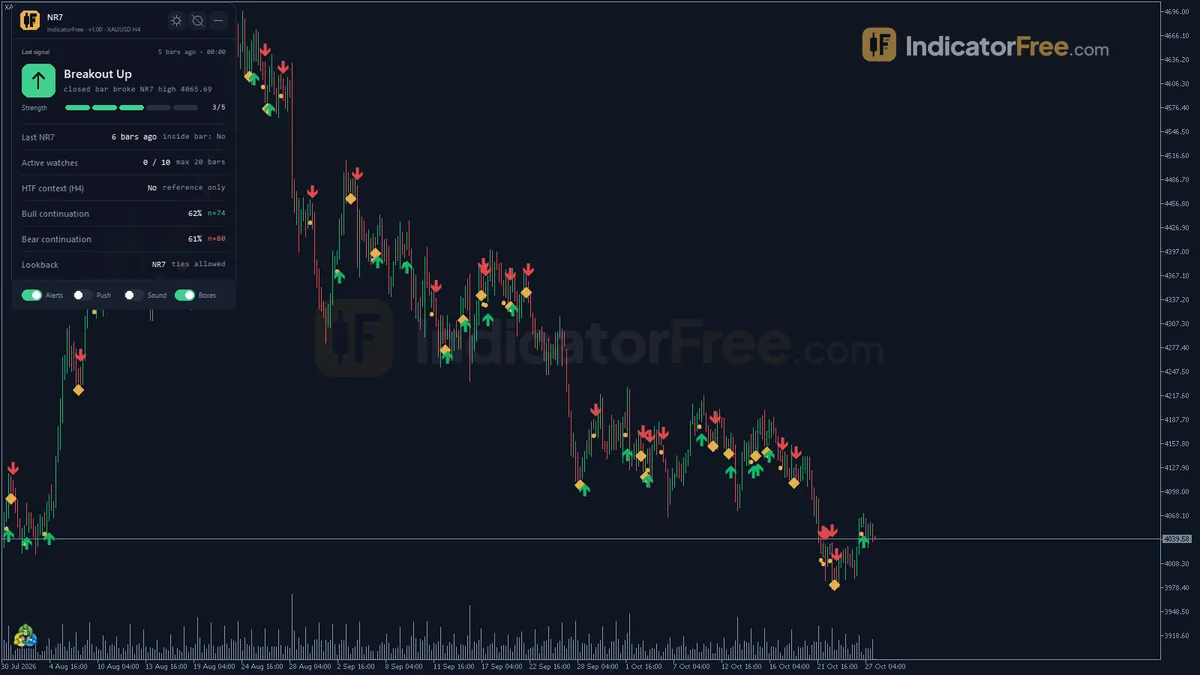
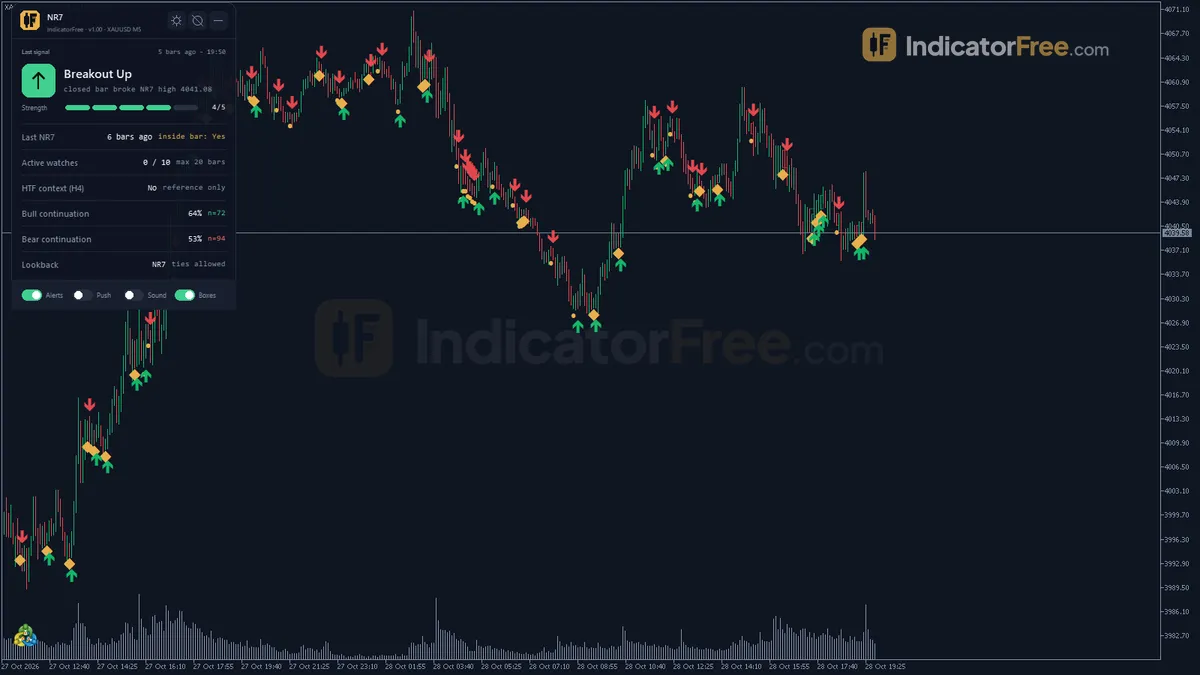
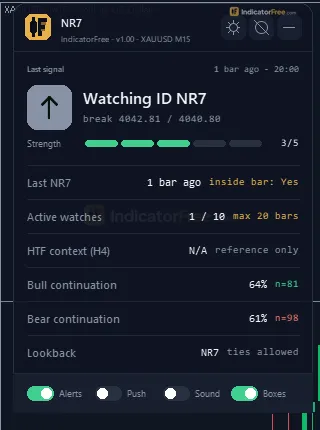
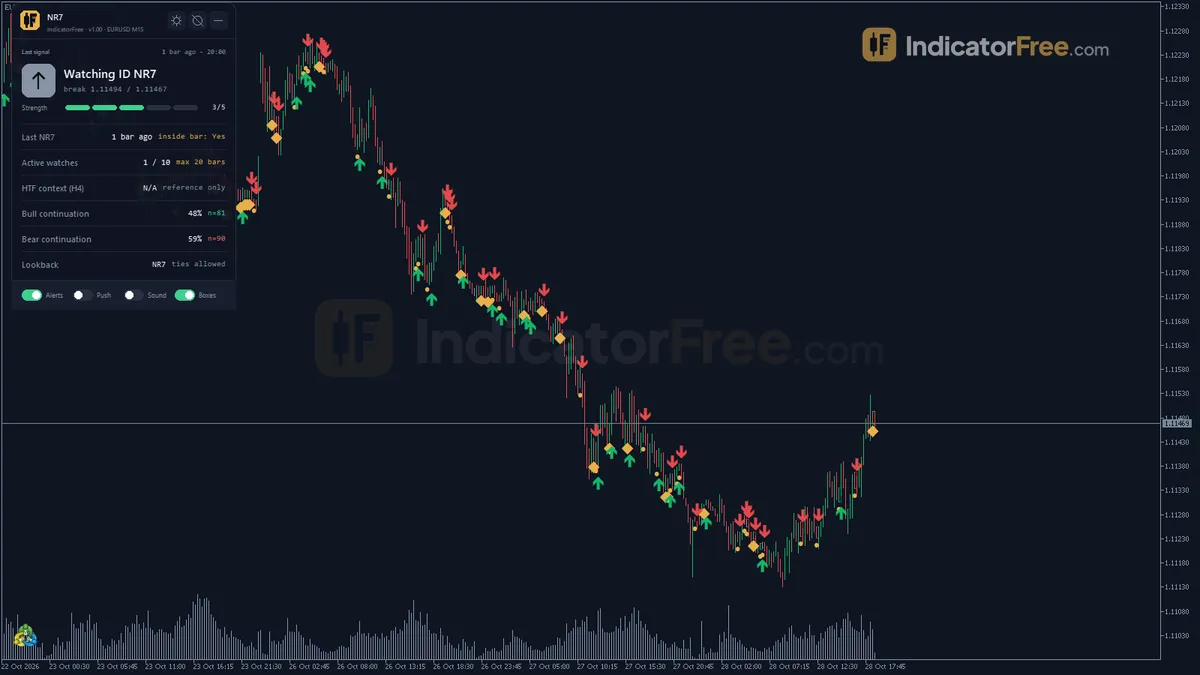
- Repainted
- 0 / 1,879
- Signals / week
- ≈ 147.8
- Tested on
- EURUSD M15
- Tested
- 2026-10-05
Overview
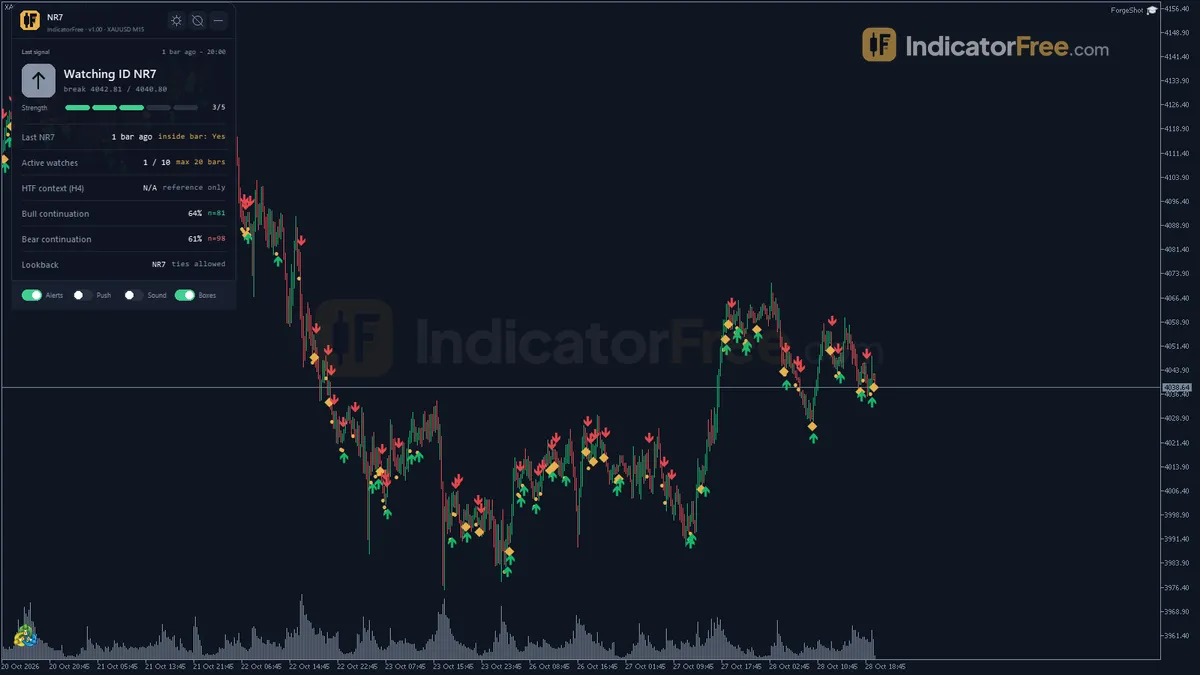
NR7 for MT5 is for intraday breakout traders: it finds the bar with the smallest high-low range of the last 7 closed bars. It tags the ones that are also inside bars, draws a box around their high and low, and puts an arrow on the bar that breaks out of that box. In the Lab's repaint test on EURUSD M15 real ticks, 0 of 1879 signals changed and no arrow arrived late.
It does not tell you which way the move will go.
What NR7 draws on your chart
A narrow-range bar is a sign of volatility contraction: the market has gone quiet. The NR7 pattern, from Crabel's work, is simply the narrowest bar of the last seven.
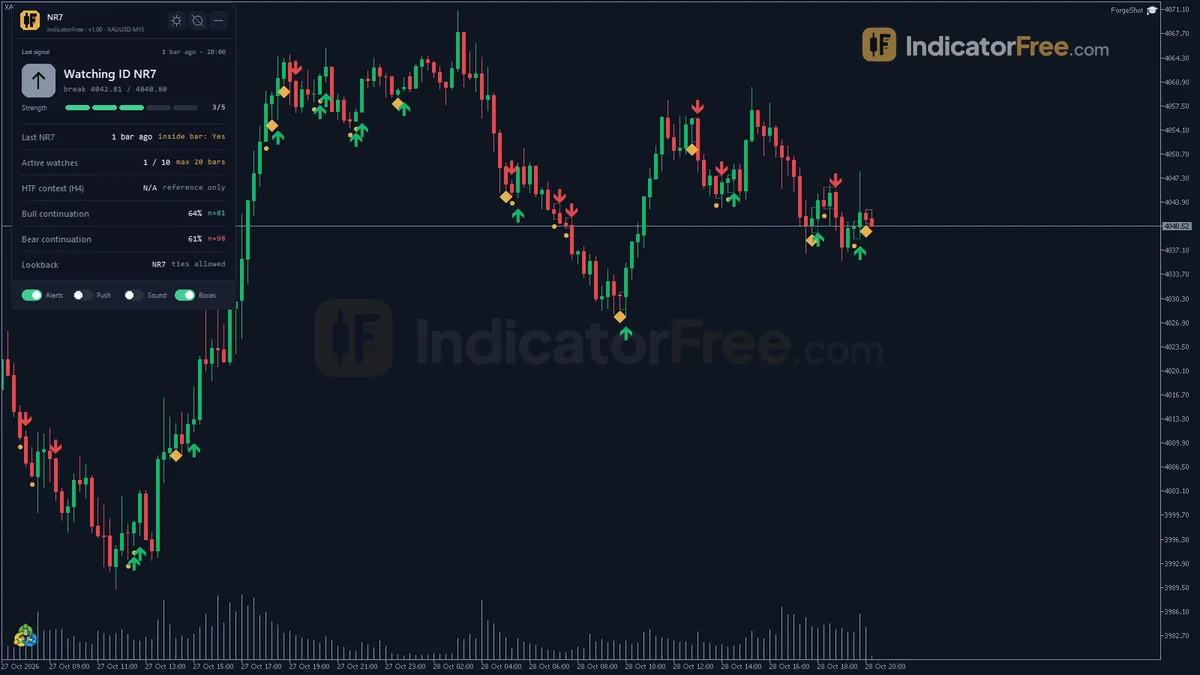
The indicator works on closed bars only and draws everything in the main chart window, with no subwindow:
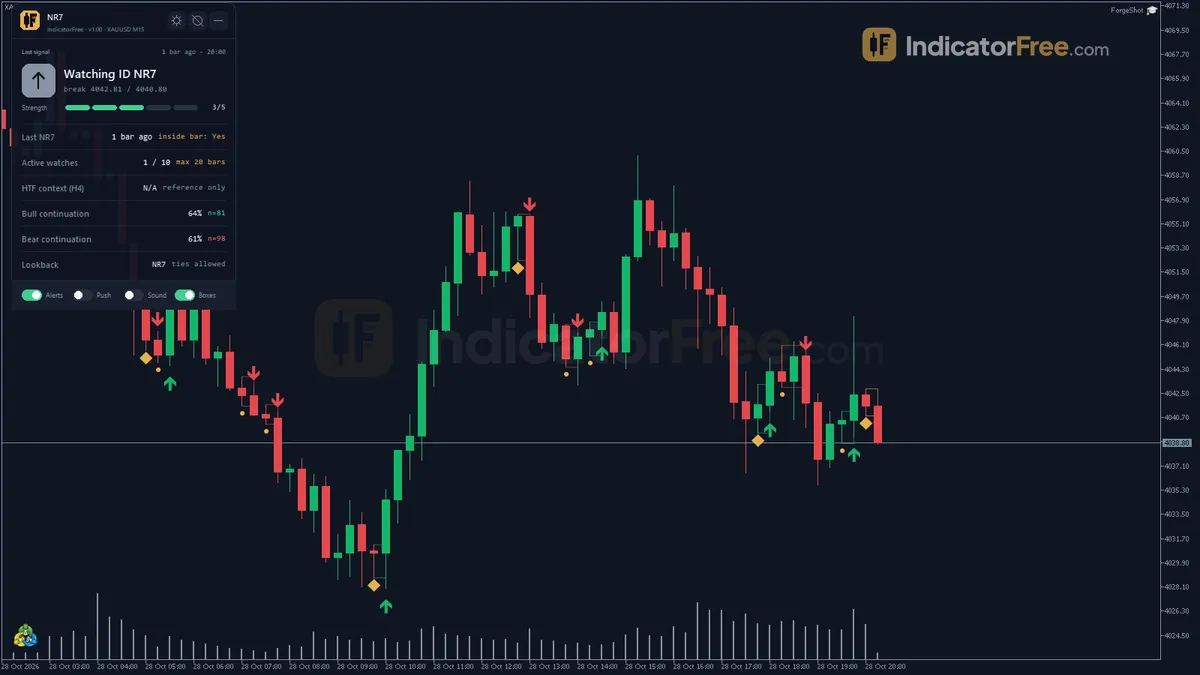
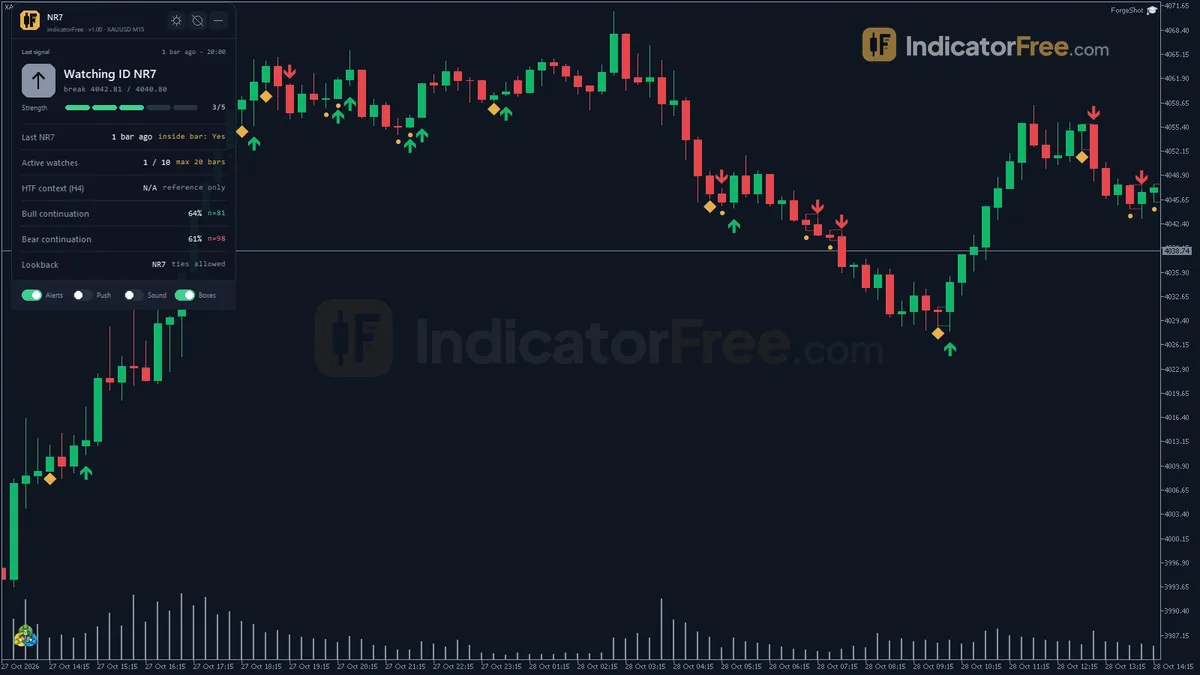
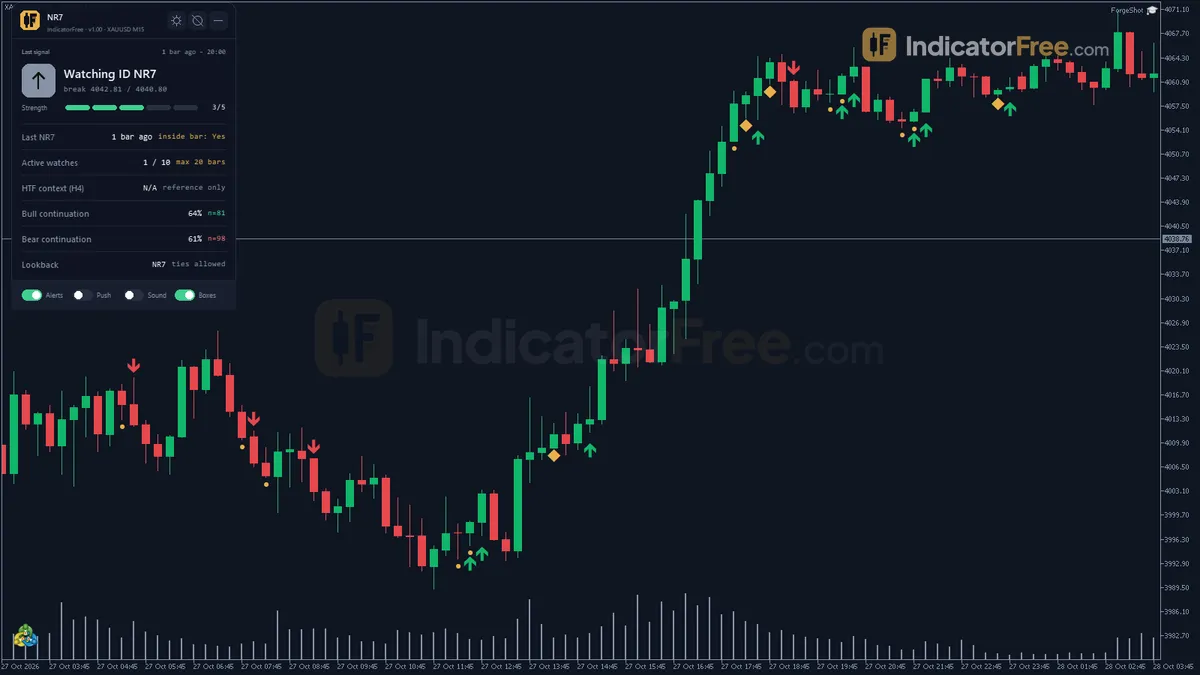
- NR7 Bar arrow: a closed bar whose range is the smallest of the last
Lookbackbars, counting itself. - ID NR7 diamond: an NR7 bar that is also an inside bar. Its high is at or below the previous high and its low is at or above the previous low. A bar gets one tag or the other, never both.
- NR7 Box: a rectangle over the NR7 bar's high and low, drawn while that bar is being watched.
- Breakout Up / Breakout Down arrows: drawn on the first closed bar that leaves the box on one side.
- Status panel: a summary of recent signals and statistics, described in full under How it works.
How the Lab tested it
The Lab tested version 1.00 (145.1 KB) on MT5 build 6230 on 2026-10-05. It replayed EURUSD M15 from 2026-07-06 to 2026-10-02 using Raw Trading Ltd real ticks. Every arrow was logged at the moment it appeared, then compared with the finished history. None of the 1879 signals changed or disappeared, and the maximum arrow delay was 0 bars. Each arrow stays on the bar that closed with its condition met, so this is a non-repainting indicator in the strict sense.
The Lab then measured the same signals with an ATR test: did price move 1 ATR in the signal's direction before it moved 1 ATR against it? Across all signals, 48% did. The bars below split that result by marker type, with the number of signals for each in brackets.
Scale zoomed in to show the difference (bars do not start at zero).
What these numbers mean for you
- Direction is a coin flip. Both breakout arrows score below 50%. On its own, an arrow tells you no more about the next 1-ATR move than tossing a coin. ID NR7 is the only marker above half, but only by a few points and on the smallest sample, which is too small a gap to count as an edge. The NR7 and ID NR7 markers have no direction of their own, and the Lab facts do not say which side was counted for them. Use their two figures as reference only.
- Price moved soon, but there is no baseline. Only 3.6% of signals saw no 1-ATR move within 20 bars, and the median signal hit 1 ATR in 3 bars. The Lab did not compare this with ordinary bars, so it shows that price moves soon after a marker. It does not prove the marker predicts a bigger move than usual.
- It is busy. On M15 it gave 147.8 signals a week: 45.7 NR7 Bar, 28.2 ID NR7, 34.2 Breakout Up and 39.7 Breakout Down. That is about 30 markers per trading day (147.8 a week ÷ 5), so you will need your own filter.
Who it is for
NR7 suits traders who already have a way to choose direction (trend, structure, a higher-timeframe bias) and want two things from one tool: a clear trigger level and a risk line on the other side of the box.
How it works
- 1Measure the high-low range of every closed bar in points.
Range = High - Low - 2A bar is narrow-range when its range is the smallest of the last bars. Strict mode excludes ties.
NR if Range <= every Range of the previous Lookback - 1 barsInputs: Lookback, RequireStrictMin - 3If the narrow bar sits fully inside the previous bar's high and low, tag it as an inside-bar combination.
Inside if High <= previous High and Low >= previous LowInputs: EnableComboTag - 4Watch the narrow bar's high and low. The first bar breaking one side signals a breakout, otherwise the watch expires.Inputs: ShowBreakoutSignals, MaxWatchBars, MaxActiveWatch
- 5Test past narrow bars: after a breakout, did price reach the projected target before touching the opposite side?
Target up = NR High + ContinuationMultiple x NR RangeInputs: EnableStats, StatsHistoryBars, StatsLookBars, ContinuationMultiple
Specifications
- Platform
- MetaTrader 5
- Version
- 1.00
- Type
- Indicator
- Window
- Main chart
- Draws
- 4 arrows, 1 zone, 1 panel
- Alerts
- popup, push, sound
- Repaints
- No (0 of 1,879 signals changed)
- Inputs
- 21
- Tested on
- MT5 build 6230 · 2026-10-05
Repaint test
No repaint detected. In a 6 Jul 2026 – 2 Oct 2026 test on EURUSD M15 (Raw Trading Ltd real ticks), 1,879 signals were logged at bar close and re-read at the end of the test: 0 changed. Arrows print on the bar that closes the signal, with no delay.
IndicatorFree — tested 2026-10-05 · MT5 build 6230 · Raw Trading Ltd real ticks. Results come from historical data, not live trading, and do not guarantee future results.
Signal statistics
Over 6 Jul 2026 – 2 Oct 2026 on EURUSD M15, the indicator printed 1,879 arrows. After 48% of them, price moved 1×ATR(14) in the arrow's direction before moving 1×ATR against it (median 3 bars). 3.6% reached neither level within 20 bars.
This measures price movement after the arrow, not a trading result. It includes no spread, commission, stop loss or position sizing.
What it draws
- Arrows (NR7 Bar) from buffer 0, drawn on the closed bar.
- Arrows (ID NR7) from buffer 1, drawn on the closed bar.
- Arrows (Breakout Up) from buffer 2, drawn on the closed bar.
- Arrows (Breakout Down) from buffer 3, drawn on the closed bar.
- Rectangles (NR7 Box) drawn as chart objects, not buffers — they are not readable by iCustom() in an EA.
- An on-chart panel (Status); values shown in the panel are not exposed as buffers.
Inputs
| Input | Default | What it does |
|---|---|---|
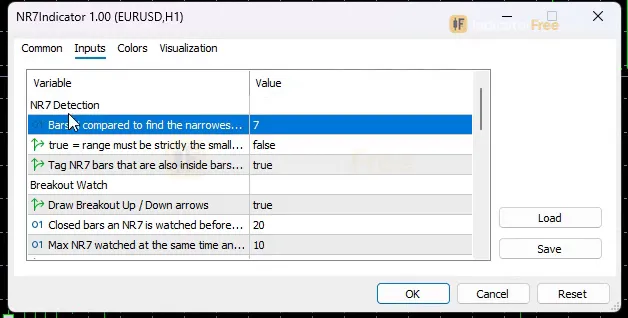
| Lookback | 7 | Bars N compared to find the narrowest range (NR-N, 3-20; 7 = Crabel NR7) |
| RequireStrictMin | false | true = range must be strictly the smallest (no ties); false = ties allowed |
| EnableComboTag | true | Tag NR7 bars that are also inside bars as ID NR7 (diamond marker) |
| ShowBreakoutSignals | true | Draw Breakout Up / Down arrows |
| MaxWatchBars | 20 | Closed bars an NR7 is watched before it expires (5-100) |
| MaxActiveWatch | 10 | Max NR7 watched at the same time and max boxes kept (3-30, oldest dropped) |
| ShowBoxes | true | Draw a box around the NR7 high/low while it is watched |
| UseHTFContext | true | Show whether the last closed bar of HTFPeriod is also an NR-N bar |
| HTFPeriod | H4 | Timeframe used for the NR7 context (reference only, no effect on signals) |
| EnableStats | true | Show historical continuation win rate after breakouts |
| StatsHistoryBars | 1000 | Closed bars scanned for the statistics (200-5000) |
| StatsLookBars | 10 | Max bars from NR7 to breakout, and bars after breakout to judge Win/Loss (3-50) |
| ContinuationMultiple | 1 | Win target = breakout side + this x NR7 range (0.5-3.0) |
| AlertPopup | true | Popup alert on a new NR7 and on a confirmed breakout |
| AlertPush | false | Push notification on a new NR7 and on a confirmed breakout |
| AlertSound | false | Play a sound on a new NR7 and on a confirmed breakout |
| SoundFile | alert.wav | Sound file played when sound alerts are on |
| ShowPanel | true | Show the on-chart status panel |
| PanelScale | 1 | Panel size multiplier (DPI is applied automatically) |
| Theme | Dark | Chart color theme |
| RestoreTheme | true | Restore the original chart colors when removed |
How to read it
Install: copy the file into your MQL5\Indicators folder, refresh the Navigator, and drag NR7 onto a chart.
Reading the NR7 Bar and ID NR7 markers
These markers point to a quiet bar. They are not entry signals. When a bar closes, the tool measures its range (High − Low) and compares it with the previous Lookback − 1 bars. If none of those bars has a smaller range, the bar is marked NR7.
With RequireStrictMin off (the default), ties count. In a dead session, two equally small bars close together can both be marked. If the NR7 bar also sits inside the previous bar and EnableComboTag is on, it gets the ID NR7 diamond instead. Read the diamond as a tighter squeeze: the bar is both the narrowest of its group and fully inside the bar before it.
Reading the box and the breakout arrows
The box marks the trigger zone. The picture below shows the order of events: a narrow bar, its box, and the first bar that breaks out of it.
Breakout Up is drawn on the first closed bar, within MaxWatchBars bars of the NR7, that trades above the NR7 high without trading below the NR7 low. It is also drawn when a bar trades through both sides and closes above the high. Breakout Down is the mirror image. If no bar breaks out within MaxWatchBars, the watch expires and no arrow is drawn.
Two common misreads:
- The arrow does not mark the moment price crosses the box. It appears when the breakout bar closes. On a live chart, price is already outside the box by the time you see the arrow. After a long breakout bar, entering on that close means you start far from your risk line.
- An arrow can sit on a bar that hit both sides. When a bar traded through both edges of the box, the arrow only tells you where it closed. Check the wick: if it reached the opposite side of the box, a stop placed there would already have been touched.
The status panel
The panel shows the last NR7 or breakout, the number of active watches, and the higher-timeframe NR7 context set by HTFPeriod. It also shows historical bull and bear continuation win rates. These rates come from your own chart: the tool scans the last StatsHistoryBars closed bars and finds past NR7s that broke out within StatsLookBars bars. For each one, it checks whether price then reached the breakout side plus ContinuationMultiple × the NR7 range before touching the opposite side of the box. The target line in the illustration above shows that target with the default multiple of 1.
Inputs that change what you see
| Input | Default | What changing it does |
|---|---|---|
Lookback | 7 | Number of bars compared (3-20). Lower means more frequent, less selective NR bars. Higher means rarer, tighter squeezes. |
RequireStrictMin | false | true drops ties, so only a strictly smallest range is marked. |
EnableComboTag | true | Turns the ID NR7 diamond on or off. |
ShowBreakoutSignals | true | Turns off the breakout arrows if you only want the squeeze markers. |
MaxWatchBars | 20 | How long an NR7 stays live (5-100). Shorter keeps only fresh breakouts. |
MaxActiveWatch / ShowBoxes | 10 / true | Limits clutter (3-30 boxes) or hides boxes completely. |
UseHTFContext / HTFPeriod | true / H4 | Higher-timeframe NR context shown in the panel. Reference only. |
EnableStats, StatsHistoryBars, StatsLookBars, ContinuationMultiple | true, 1000, 10, 1 | Panel statistics only (200-5000 bars, 3-50 bars, 0.5-3.0). They do not change the arrows. |
ShowPanel, PanelScale, Theme, RestoreTheme | true, 1, Dark, true | Display only. |
Alerts
Alerts fire on a new NR7 and on a confirmed breakout. AlertPopup is on by default and opens MT5's alert window. AlertPush sends the alert to the MetaTrader mobile app linked to your terminal. AlertSound plays SoundFile (default alert.wav). Push and sound are both off by default. On M15 and lower, popups will fire often. Alerts fire for both new NR7s and breakouts; there is no breakout-only alert option.
A decision rule for each signal
- NR7 Bar or ID NR7 appears: do not trade it. Note the box edges.
- Breakout arrow appears: take it only if its direction matches the bias you already have from another tool or a higher timeframe. On its own, the arrow tested at coin-flip level.
- Skip the arrow if the breakout bar's wick touched the opposite side of the box.
- Place risk beyond the opposite side of the box. The panel's statistics count a touch of that line as a loss.
- Re-check a few bars later. If price has not moved 1 ATR away within about 3 bars (the Lab median on EURUSD M15), the move is slower than the typical Lab signal. Manage or exit the trade instead of waiting.
Installation
- 1Download NR7Indicator.ex5 from the button above (Google Drive).
- 2In MetaTrader 5: File → Open Data Folder → MQL5 → Indicators. Copy NR7Indicator.ex5 there.
- 3Restart MT5 or right-click Indicators in Navigator → Refresh.
- 4Drag NR7 onto a chart. For push alerts, enable "Allow push notifications" under Tools → Options → Notifications.
- Tested on MT5 build 6230.
Key terms and guides
- Average True Range
- Average True Range (ATR) is a volatility indicator that shows how far price typically moves per candle, gaps included, averaged over a set number of candles. It measures the size of moves, not their direction.
- Trigger price
- A trigger price is the price level that switches a waiting order on. When the market reaches it, your stop, stop-limit or trailing order is sent for execution. It is not the price you are guaranteed to get.
- Every tick based on real ticks
- Every tick based on real ticks is the MT5 Strategy Tester mode that replays the actual bid and ask ticks your broker recorded, with the real changing spread, instead of ticks the tester invents from 1-minute bars.
- Inside bar
- An inside bar is a candle whose high and low both stay within the high and low of the candle just before it, called the mother bar. It shows the market pausing and its range shrinking before the next move.
- NR7
- NR7 (narrow range 7) is a candle whose high-to-low range is the smallest of the last seven candles, counting itself. Traders read it as a sign that volatility has dried up and that a breakout may follow.
- Volatility contraction
- Volatility contraction is a stretch where a market's candles and ranges shrink to unusually small sizes. It is often measured as Bollinger Band width or ATR at a multi-candle low, and a wider move in either direction tends to follow.
- Guide: What Is a Fair Value Gap in Forex? How to Spot and Trade One
- Guide: How to Read Candlestick Charts: Bodies, Wicks and Shapes Explained
More on this subject: Price action & SMC guide, terms and tools
User reviews
No reviews yet. Members who download the tool can review it here.
Sign in and download the tool to review it.
Build a checklist with it
NR7 does one job on the chart: risk / volatility. Put it on the same chart as the tools below and the IndicatorFree panels merge into one checklist card, ordered trend, zone, signal, risk.
- Trend / contextMarket Structure MapAdds the trend side: which way the market leans before you act on NR7.
- Entry signalBreakout ConfirmationAdds the entry signal: the moment to act once NR7 has set the scene.
The Lab has not tested these combinations. Each tool is tested on its own; the card only lines up what each one says. Free members get 2 new tools a day. If one has to wait until tomorrow, install BlackBox to raise the limit to 5 a day (20 on a live account).
FAQ
Does NR7 repaint?
No repaint detected. In a 6 Jul 2026 – 2 Oct 2026 test on EURUSD M15 (Raw Trading Ltd real ticks), 1,879 signals were logged at bar close and re-read at the end of the test: 0 changed. Arrows print on the bar that closes the signal, with no delay.
Can I use NR7 in an EA?
Yes. Read buffer 0 (NR7 Bar) with iCustom() on bar 1 — the last closed bar.
Why can’t my EA read the zones?
Zones and the panel are chart objects, not indicator buffers, so iCustom() does not return them.
How do I get alerts on my phone?
Enter your MetaQuotes ID under Tools → Options → Notifications, tick "Enable push notifications", and keep the push alert input on.
Does it work on other pairs?
Tested on EURUSD only; other symbols not tested.
Can I use it as NR4 or another NR-N pattern?
Yes. Set `Lookback` anywhere from 3 to 20; 7 is the classic Crabel NR7. Keep in mind that all Lab numbers on this page were measured with the default of 7.
Which timeframes and symbols does it work on?
It runs on any MT5 symbol and timeframe because it only compares bar ranges. On other charts, use the panel's statistics to judge how squeezes behave there.
Why do some NR7 boxes disappear?
A box stays only while its NR7 is being watched. The watch ends when the breakout comes or when `MaxWatchBars` closed bars pass with no breakout. When more than `MaxActiveWatch` boxes exist, the oldest one is deleted.
Why don't the panel's win rates match the Lab's results?
They measure different things. The panel uses your own chart's last `StatsHistoryBars` bars and a target based on the NR7 range (`ContinuationMultiple`). The Lab used a 1-ATR test on EURUSD M15 real ticks. Both look back at past data, and neither guarantees future results.
Will it change my chart colors?
Yes. It applies the `Theme` you pick (Dark by default). With `RestoreTheme` on, your original chart colors come back when you remove the indicator.
Changelog
- 1.00Initial release: Crabel NR7 (Narrow Range 7) detection on closed bars, with ID NR7 combo tagging (NR7 + inside bar), directional Breakout Up/Down arrows, high/low watch boxes with auto-expiry (MaxWatchBars) and a. · 2026-10-09
Final verdict
Lab verdict on NR7 1.00
NR7 is a narrow-range and breakout marker, not a direction signal. Its closed-bar logic gave a clean repaint result, and price moved soon after its markers in the Lab test, though the Lab did not check whether that beats ordinary bars. The boxes turn that idea into concrete levels you can use, a trigger on one side and a risk line on the other. The panel's continuation statistics are a useful bonus because they let you check how squeezes behave on your own symbol before you rely on them.
Where it falls short
- The breakout arrows do not pick direction better than chance in the Lab test. Treat them as triggers for a bias you already have.
- There is no trend filter built in. The higher-timeframe NR context in the panel is information only.
- The only Lab numbers are for EURUSD M15. The tool runs on other symbols and timeframes, but those results do not carry over.
- The panel's win rates come from the history on your chart. They describe the past and are not a forecast.
Use it or skip it
The split below is the short version of who should download it.
- –You already have a direction from trend or structure and want timing
- –You want a defined risk line: the far side of the NR7 box
- –You trade intraday breakouts and can act within a few bars
- –You want to test squeeze behaviour on your own symbol with the panel stats
- –You want a standalone buy/sell arrow
- –You cannot filter dozens of markers a day on M15 or lower
- –You need Lab-tested numbers for a symbol or timeframe other than EURUSD M15
- –You would enter every arrow without a stop beyond the box
Settings to start with
The defaults are the settings the Lab tested, so begin there. The changes below are untested starting points, not tested by the Lab. Compare each one with the default on your own chart:
RequireStrictMin= true on M5 or M15, to drop tied bars in quiet sessions.MaxWatchBars= 10 on M15, to keep only breakouts that come soon after the squeeze.Lookback= 4 if you want more setups (NR4), or 10 if you want rarer, deeper squeezes.ContinuationMultiple= 0.5 next to the default 1, to see in the panel how often a smaller target was reached. This setting does not change the arrows.
An idea to pair it with
Two ideas the Lab has not tested: pair it with Average Daily Range to see how much of the day's typical range is used, or with ATR Period for a slower view of volatility.